Oven-baked Crispy Lemon Wings (Whole30/Paleo friendly)

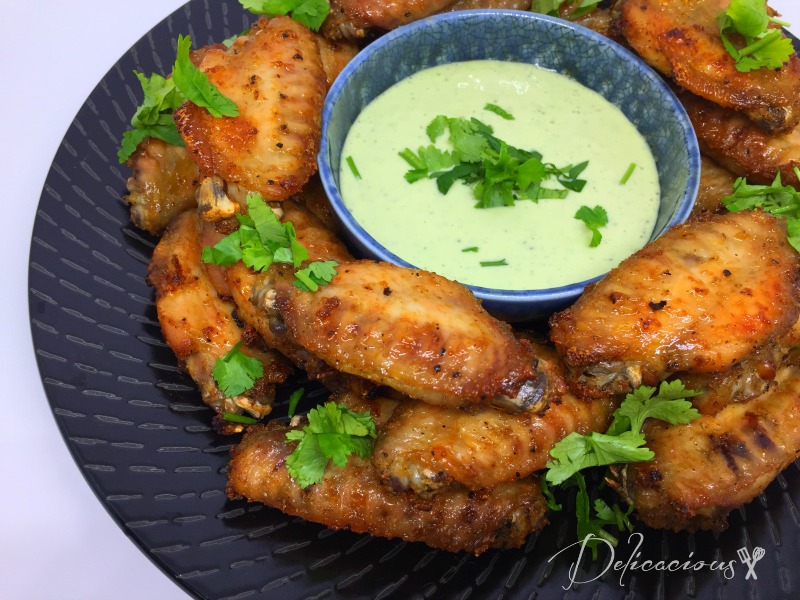
crispy lemon wings

About two weeks ago, hubby and I started on the Whole30 diet. Basically, we eat real food for 30 days, and eliminate SUGAR, dairy, legumes, grains and alcohol, as well as MSG, Careenagans and Sulphites. What do we eat then? Well, things like these mouthwatering oven-baked crispy lemon wings! The wings are excellent on their own, but when paired with homemade ranch dressing, everything goes up by a notch! They are so good, that I’ve come out of my blogging hiatus to blog about this recipe!

I used a mish mash of techniques for this recipe. Before whole30, I used to bake oven crispy wings by mixing wings with a mix of salt and baking powder, drying them in the fridge, then baking them at a very low temperature in the oven to dry the wings up further before cranking the temperature up. Since baking powder is not whole30 compliant, I can’t use this method. However, I figured that drying the wings at low temperature in the oven would still aid in bringing out the crispiness of the wings. So the basic method is this: Marinate the chicken with a dry rub, keep it in the fridge for a couple of hours. Bake the wings at low temperature before cranking it up. Remove from oven, coat with a lemon “butter” marinade and bake them for a quick 5-10 minutes. Convinced that you should bake some up for dinner? Here’s the recipe!

Oven-baked Crispy Lemon Wings (Whole30/Paleo friendly)
 
Author:
Cuisine: Paleo
Ingredients
Chicken marinade
  • 2 tbsp olive oil
  • 1 kg chicken mid-wings
  • 2½ tsp sea salt
  • ½ tsp black pepper
  • 1½ tsp garlic powder
  • 2 tsp onion powder
  • zest of 1 lemon
Lemon "butter"
  • 80ml of ghee (1/3 cup)
  • 60 ml olive oil (1/4 cup)
  • 3 garlic cloves, minced
  • juice of 1 lemon
Instructions
  1. Mix wings with olive oil.
  2. Combine salt, pepper, garlic powder, onion powder and lemon zest together.
  3. Mix the dry rub with coated wings and place them in a sealed ziplock bag. Refrigerate for 4-8 hours.
  4. Preheat oven to 120C. Place wings on a greased rack (with another tray below it) and bake for 30 minutes.
  5. Turn up the oven temperature to 230C. Bake for another 30 minutes.
  6. Meanwhile, in a small saucepan, combine ghee and olive oil over medium heat.
  7. Once the ghee has melted, add in the garlic and stir for a minute or so.
  8. Pour in lemon juice, stir to combine and remove from heat.
  9. When wings are done, remove from the oven and brush generously with the lemon "butter". Return to the oven for 5 minutes. Flip wings over and brush with more lemon "butter" and bake for another 5 minutes. Serve with homemade ranch dressing.
Notes
Ranch dressing recipe can be found on the Whole30 site:
https://whole30.com/2014/08/mayo-ghee-sauces/


Instant Pot Pho Ga (Vietnamese Chicken Pho)

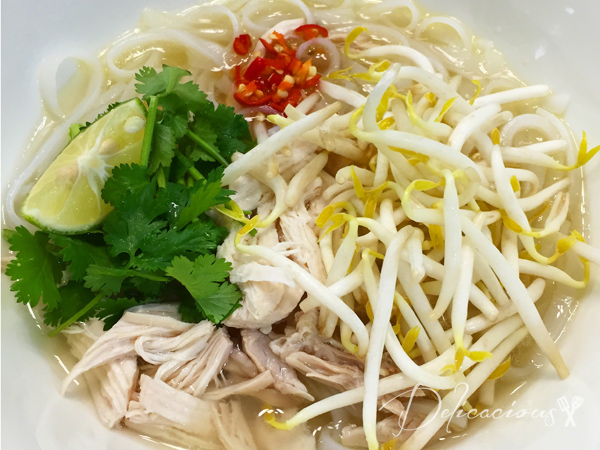
Pho Ga

Hubby and I just returned from Hanoi, Vietnam about a week ago. It was the first time since the kids were born that we had the opportunity to take a solo trip and we thoroughly enjoyed it. One of our highlights was the cooking lessons from Apron Up. I promised them that I’d blog about them so look out for the next blog post on that happening, sometime this week hopefully. Anyway, one of the dishes that we learnt was Pho Bo, or Beef Pho. Both Pho Bo and Pho Ga are popular Vietnamese breakfast dishes, and both involved simmering the soup broth for long hours. Long hours? That seems like a dish to try to re-make with the Instant Pot! And that was just what I tried to do this past weekend – making Pho Ga, or Chicken Pho, with the Instant Pot. I applied some of the techniques that I learnt from making Pho Bo in the making of Pho Ga.

Before I share the recipe, here are some quick tips:

  • This recipe requires the use of either a grill or oven to broil and char the onion and the ginger. I’d suppose it’s possible to omit this step and just attempt to brown the onion and the ginger with the rest of the herbs but the depth of flavour of the broth would be compromised.
  • It is absolutely essential to parboil the chicken bones to remove the scum. This step is the key to yielding a clear broth.

Here’s the simple recipe. Enjoy!

Instant Pot Pho Ga (Vietnamese Chicken Pho)
 
Author:
Cuisine: Vietnamese
Serves: Serves 4
Ingredients
  • 1 whole chicken
  • 1 large red onion, cut in quarters
  • 3-inch piece of ginger
  • 2 star anise
  • 5 cloves
  • 2 tbsp coriander seeds
  • 2 litres of water
  • 1 bunch of coriander/cilantro stems, tied with cooking string (about 6 would suffice)
  • 2 tbsp fish sauce
  • 2 tbsp sugar
  • salt and pepper to taste
  • Pho noodles, rehydrated
  • 1 lime, quartered
  • Beans sprouts, washed and tails removed
  • Coriander leaves
  • Birds eye chilli
Instructions
  1. Remove the chicken breast from the chicken and set aside. Cut the remaining chicken up by separating the thighs, feet, wings and neck.
  2. Broil the onion sections and ginger in the oven till slightly charred. Turn the sections frequently to ensure even browning. The ginger and onion should become slightly soft.
  3. Allow the onion and ginger to cool down slightly before removing the charred portions. Set aside.
  4. Place the chicken parts (except the breast meat) into a large bowl. Pour enough boiling water into the bowl to cover the chicken parts. Allow it to sit for about 5 minutes. Rinse the scum off the chicken parts and set aside.
  5. Set the Instant Pot to saute mode.
  6. Add the star anise, cloves and coriander seeds to the pot and toast the spices till fragrant (5 minutes). Add the spices into a spice bag.
  7. Fill the pot with 2 litres of water.
  8. Add in the spice bag, ginger, onion, coriander stems and chicken parts (except the breast).
  9. Set the Instant Pot to High Pressure, and set the timer for 25 minutes.
  10. When the timer beeps, allow it to release pressure naturally for about 10 minutes, before carefully de-pressurising the pot.
  11. Open the pot and remove the scum, if any, from the surface of the broth. Remove the chicken legs. Shred the meat off the chicken legs and return the bones to the pot.
  12. Add in the chicken breasts, fish sauce and sugar. Set the IP to High Pressure for another 10 minutes.
  13. Rehydrate the pho noodles according to instructions.
  14. When the pot beeps, allow it to release pressure naturally for about 7-10 minutes before carefully depressurising the pot.
  15. Add in salt and pepper to taste. (I added in 1 - 2 tsp of salt)
  16. Remove the chicken breasts and shred the meat. Remove all the other ingredients from the pot.
Assembling the pho bowls
  1. Add some pho noodles to a bowl.
  2. Top the noodles with some bean sprouts.
  3. Ladle the clear broth over the noodles.
  4. Top with shredded chicken meat, cilantro leaves, lime and birds eye chilli, if desired.
  5. Serve hot.


Instant Pot Beer Braised Pulled Pork

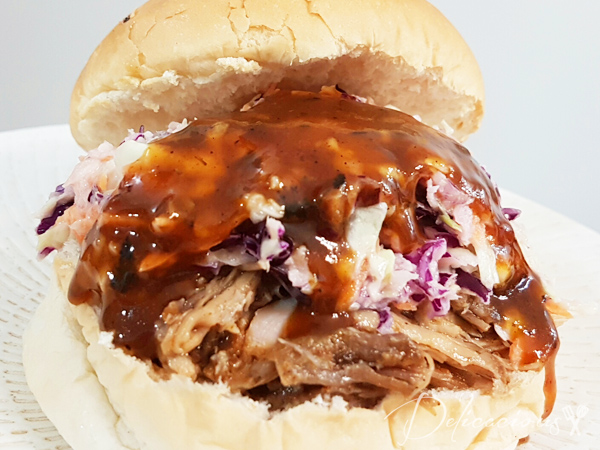
Instant Pot Beer braised pulled pork

After a few crazy months of renovations and managing the house move, it’s finally over and I can START COOKING! The biggest addition to the new kitchen is the Instant Pot. My friend, who blogs at Still Feeling Peckish, a low carb blog, raved about the pot on her facebook page and I was sold. I happened to be in the US, and so I crazily lugged one back to Singapore, thinking that I could use my existing transformer. Unfortunately, the transformer started smoking and we realised that we had rather “cleverly” used a 250W transformer on a 1000W pot. Thank goodness no one was harmed and the new house remained intact. Found someone selling a brand new 3000W transformer (yes, overkill I know) on Carousell for a good price, bought it and I CAN FINALLY USE MY POT!!!

The first thing I made after the water test was some garlic lemon chicken, but they were not blog worthy enough. The second thing I made, to feed my super hungry CG mates (11 adults who can eat like 20 adults) were these pulled pork burgers. And mind you, these are not your ordinary pulled pork burgers. The pork was cooked in Irish Ale (a dark beer would do as well). They are absolutely delish, and the best part, the pulled pork took under an hour and a half to prepare. Can you imagine? Melt in your mouth goodness in just an hour and a half? I love the instant pot!

If you are reading this post, all you want is probably the recipe, and so I’ll stop raving about the burgers and just give you the recipe. Try it. You’d be amazed too.

Instant Pot Beer Braised Pulled Pork
 
Author:
Ingredients
  • 1 tbsp salt (use more if your cajun rub doesn't include salt)
  • ½ tsp ground black pepper
  • 3 tbsp cajun seasoning (I use NOMU's)
  • 1.8kg (4 lbs) pork shoulder butt (cut into 400g slabs)
  • 5 cloves of garlic, smashed with skins on
  • 1 cup of good ale or dark beer
  • ½ cup ketchup
  • ⅓ cup brown sugar
  • 3 tbsp Worchestershire sauce
  • 2 tbsp Dijon mustard (I didn't use it though)
Instructions
To make pulled pork
  1. Combine salt, pepper and cajun seasoning
  2. Rub it all over the pork pieces.
  3. Wrap it up in cling wrap and allow it to sit in the fridge for 4 hours or overnight.
  4. Set the Instant Pot (IP) to saute mode.
  5. Brown each pork piece and set aside.
  6. Click cancel, and select the manual mode on the IP and set the timer to 45 min.
  7. Place the pork pieces back into the pot, and scatter the garlic around it.
  8. Pour in the ale/beer.
  9. When the timer is up, allow the pot to release pressure naturally for about 15 min.
  10. Remove the pieces of pork carefully and set aside.
  11. Set pot on saute mode. Add ketchup, brown sugar and Worchestershire sauce. Stir and allow it to reduce slightly.
  12. Meanwhile, pull the pork with two forks. Add some of the reduced sauce to the pork and mix.
  13. Thicken the remaining sauce in the pot by mixing two tbsp of cornstarch with some water, and adding the cornstarch mixture to the sauce. Let it boil and slowly thicken. When you reach your required consistency, turn off the pot and pour out the BBQ-beer sauce.
To-assemble
  1. Toast some burger buns, pile on the pulled pork, drizzle the thickened sauce over and top the pork with some slaw. Tuck in!
Notes
Adapted from: http://www.foodnetwork.com/recipes/dave-lieberman/beer-braised-bbq-pork-butt-recipe.html


Gula Melaka Agar (Palm Sugar Agar)

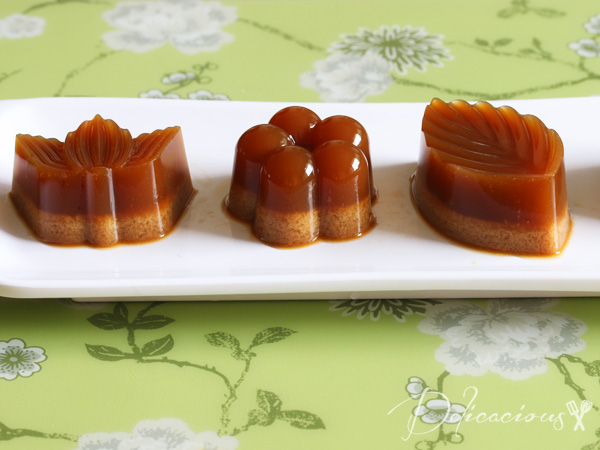
gula melaka agar

Gula melaka and coconut = a match made in heaven. How can anything with gula melaka and coconut not taste good? That probably explains why these little pieces of deliciousness were highly sought after at the last two gatherings that I brought them to. A few friends mentioned that it reminded them of their childhood, when their mothers or grandmothers used to make them these desserts. Did you know that this two layered agar was made from one mixture? That’s right, I did not create two separate layers – the layers separated on their own after cooling. That’s why this dessert is perfect – it’s a nostalgic crowd pleaser and it looks like you put in more work than you actually did. My friends thought that I took the time to make the agar layer by layer and were really surprised when I told them that I didn’t.

The recipe is pretty straight forward, but here are some tips to get the layers to separate nicely:

1) Ensure that the gula melaka and agar mixture is boiling before you pour in the coconut milk.
2) After your pour in the coconut milk, give it a quick stir and bring it to the boil. Turn off the fire immediately. Do not over-stir or the gula melaka and coconut milk mixture will homogenise and you will get a uniform coloured agar agar (which is still tasty by the way).
3) After you pour the agar into the moulds, allow it to cool and harden at room temperature first. This gives the mixture time to separate. Do not move the containers or the layers may not be as distinct. You can chill the agar after it has set.

4.7 from 3 reviews
Gula Melaka Agar (Palm Sugar Agar)
 
Author:
Serves: 24 pieces
Ingredients
  • 160g gula melaka, cut into chunks
  • 3 pieces of pandan leaves, tied into a bundle
  • 750ml water
  • 1 packet agar powder (10g - I used swallow brand agar)
  • 250ml coconut milk (I use Heng Guan - Pasteurized Fresh Coconut Milk)
  • pinch of salt
Instructions
  1. In a large pot, boil gula melaka, pandan leaves in water till gula melaka dissolves.
  2. Remove pandan leaves and sieve the gula melaka mixture to remove any sediments.
  3. Add agar powder and bring the mixture back to a boil. Stir to ensure the agar powder is well dissolved.
  4. Add salt to coconut milk and stir to combine.
  5. Pour coconut milk into boiling gula melaka agar mixture. Give it a quick stir and bring it back to a boil. Turn off the fire immediately.
  6. Pour into moulds and allow the agar to set. As it sets, it should separate into two distinct layers.
  7. Once set, chill agar till required. Enjoy!


Chocolate Ganache-filled cupcakes with Peanut Butter Buttercream

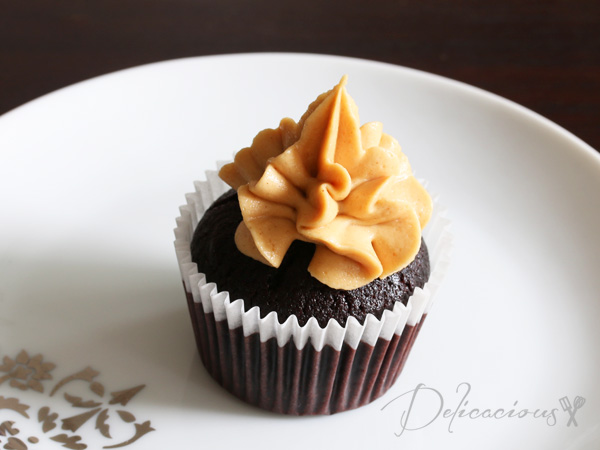
Chocolate Ganache-filled Cupcakes with Peanut Butter Buttercream

These cupcakes are likely the most decadent cupcakes that I’ve ever made. A moist chocolate cupcake topped with luscious peanut butter frosting. To up the decadent factor, I filled these cupcakes with a rich chocolate ganache. Gorgeous isn’t it? I baked 50 of these lovely beauties in two days. The first batch was for an office gathering and I ended up with so much left-over frosting that I baked another batch for my cell-group party.

To be honest, I didn’t originally plan to fill these cupcakes with ganache. However, I was inspired when I came across the Wilton filling tip on a trip to  Phoon Huat. Afterall, I had some leftover ganache from making the Chocolate Banana Cake, and thought, why not? More chocolate is always better, right? (By the way, I love love LOVE the filling tip. You don’t need to dig an ugly hole in the cupcake. Just stick the tip in and pipe away. Amazing.)

So there you have it. Chocolate ganache-filled cupcakes, topped with peanut butter buttercream. Don’t tell your guests that you’ve filled them with ganache. Watch their faces after they take a bite. You can also get creative with the filling. How about some chocolate liqueur ganache? That sounds pretty awesome too.

Chocolate Ganache-filled cupcakes with Peanut Butter Buttercream
 
Serves: 24 cupcakes
Ingredients
Chocolate Cupcakes
  • 1 cup cake flour
  • 1 cup plain flour
  • ¾ cup dutch-processed cocoa powder
  • 1 tsp baking powder
  • 2 tsp baking soda
  • 1 tsp salt
  • 1⅓ cup Demerara sugar
  • 2 eggs (room temperature)
  • ¾ cup vegetable oil
  • 1 cup buttermilk (Add 1 tbsp white vinegar and add milk to form 1 cup)
  • 1 cup hot coffee (1 tsp instant coffee granules dissolved in hot water)
  • 1 tsp vanilla extract
Chocolate Ganache
  • 60g dark chocolate couverture (I used a mix of milk and dark couverture)
  • ½ cup whipping cream
Peanut Butter Buttercream
  • 115g unsalted butter
  • 1 cup creamy peanut butter (I used Planters)
  • 1 cup icing sugar, sifted
  • 3 tbsp whipping cream
Instructions
Chocolate Cupcakes
  1. Preheat oven to 175°C and centre an oven rack.
  2. Fill a 12 hole cupcake tray with paper liners.
  3. In a large bowl, sift together the dry ingredients.
  4. In another large bowl, combine the wet ingredients.
  5. Add the wet ingredients to the dry ingredients and using a whisk and starting from the centre, slow combine till you get a smooth batter.
  6. Fill each liner till ¾ full.
  7. Bake for 17-20 minutes or until a tester inserted in the middle of the cupcake cups out clean.
  8. Cool cupcake tray and fill with the remaining batter. You should have 24 cupcakes in total.
  9. Allow cupcakes to cool completely on a wire rack before frosting.
Chocolate Ganache
  1. In a small pot, heat whipping cream till bubbles form at the side. Do not allow it to boil.
  2. Pour hot whipping cream over chocolate and whisk till chocolate melts.
  3. Refrigerate till semi solid for ease of piping.
Buttercream
  1. Using a standing mixer fitted with the paddle attachment, cream together butter and peanut butter.
  2. Add sifted icing sugar and cream on medium high speed for a few minutes till the frosting is light and fluffy.
  3. Add whipping cream and cream for another minute or so.
  4. Use frosting immediately, or refrigerate it for a short while so that it can set up a little for smoother piping.
  5. If using frosting that has been refrigerated for some time, whisk it up before use.
To Assemble
  1. Fill a piping bag fitted with the filling tip with semi-solid chocolate ganache.
  2. Insert ½ way into each cupcake and fill. Do not overfill or cupcake surface may crack.
  3. Fill a piping bag fitted with the 1M open star tip with the peanut butter buttercream.
  4. Pipe swirls or ruffles on each cupcake.
  5. Refrigerate for 30 minutes to allow buttercream to set up before serving.
  6. (For more stability in the buttercream, you can replace half the butter with shortening.)

Bacon, Cheese and Scallions Muffins

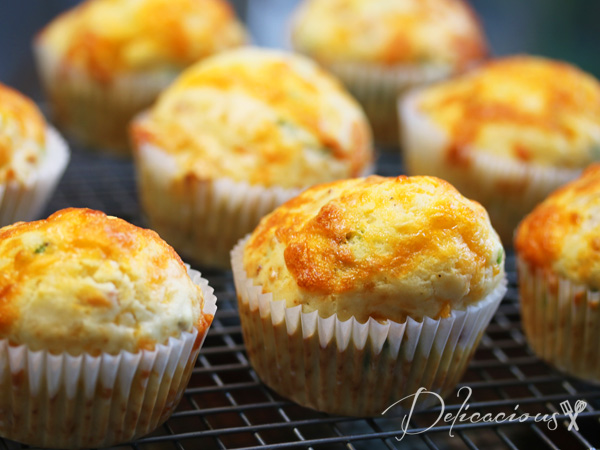
bacon cheese and scallions muffins

I’ve been baking alot of muffins lately. Maybe twice to thrice a week. I wake up in the morning, quickly put together the muffins, plop them into the oven and by the time I’m done with my shower, the muffins are also done. Piping hot breakfast for the family. The big plus? Muffins *usually* do not require the use of a mixer. I don’t even bother sifting the flour typically. Just throw all the dry ingredients in the mixing bowl and whisk them together for about 15 seconds. Done.

There a couple of sweet muffin recipes on this blog, but since my dear hubby expressed (a couple of months back) that he very much prefers savoury breakfasts, I’ve been attempting to increase the savoury quotient in our breakfasts. Cheese muffins are great. Add bacon and it’s a combination made in heaven. Scallions cut the edge off the saltiness of the cheese and the bacon. Perfect.

Bacon, Cheese and Scallions Muffins
 
Serves: 12 muffins
Ingredients
  • 2 cups plain flour
  • 2½ tsp baking powder
  • ½ tsp salt
  • ¼ tsp black pepper
  • 1 cup shredded cheese (I used cheddar)
  • ½ cup chopped scallions
  • 1 cup milk
  • 2 eggs
  • 2 tbsp olive oil
  • 4 slices back bacon, baked till crisp and cut into small squares
Instructions
  1. Preheat oven to 175°C or 160°C fan mode.
  2. Line a 12 hole muffin pan with liners.
  3. In a large bowl, whisk together flour, baking powder, salt and pepper.
  4. Add in scallions and cheese and mix to combine.
  5. Whisk together milk, eggs and olive oil in a separate bowl.
  6. Pour wet ingredients into the flour mixture and using a spatula, roughly combine the mixture.
  7. Fold in the bacon. Do not overmix!
  8. Divide among 12 muffin holes.
  9. Top with some more shredded cheese (optional)
  10. Bake on the centre rack for 20-25 minutes, or until tops are golden brown and a tester comes out clean.
Notes
Adapted from http://abeautifulbite.com/ham-scallion-and-cheddar-muffins/

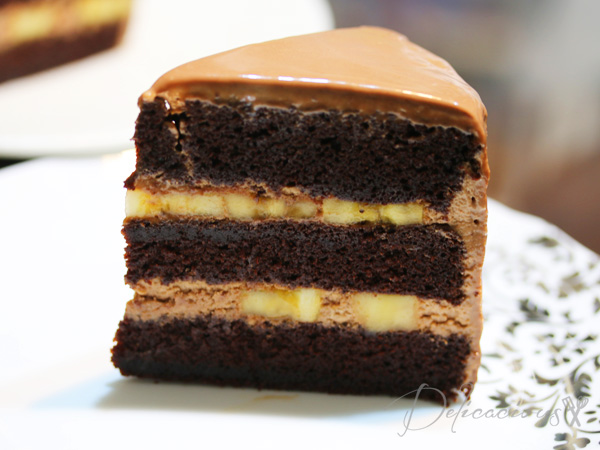
Chocolate Banana Layered Cake

chocolate banana layered cake

This was my birthday cake. And yes, I baked it myself. For the first time in forever (you can tell that my daughter is still having Disney Frozen fever), I baked myself a birthday cake. It was a spur of the moment decision really. I bake my childrens’ birthday cakes, I bake my husband’s birthday cake, I even bake my friends’ children’s’ birthday cake, why shouldn’t I bake my own birthday cake? My hubby didn’t agree though – he said I deprived him of a chance of buying me a cake. 🙂

So happy me got to bake TWO birthday cakes for myself. Well, theoretically this is the birthday cake but I had a staff workshop in the morning and baked a simpler chocolate banana cake (the non-layered type) for my colleagues. But let’s talk about this cake instead. I love the Secret Recipe chocolate banana cake. On the rare occasions that I’m there, that’s the cake I always order. Unfortunately, it’s expensive. Well, most cakes are these days. And so when I saw The Baking Biatch’s Chocolate Banana Cake, I decided to try my hand at making the cake. I didn’t end up using her recipe, as I wanted a more chocolatey cake (her sponge cake is a lighter chocolate cake with less cocoa content), but inspiration came from there.

Essentially, I used my favourite Chocolate Devil’s Food cake (recipe modified from Munira’s chocolate devil food cake) as a base, filled the in-between layers with chocolate whipped cream and bananas, and covered the cake with chocolate ganache. I used Valrhona chocolate for this cake (which really made a difference), but you can use your favourite good quality chocolate. For the many who have been asking for the recipe, here goes…

Chocolate Banana Layered Cake
 
Serves: 1 8 inch cake
Ingredients
Chocolate Cake
  • 1 cup cake flour
  • 1 cup plain flour
  • ¾ cup dutch-processed cocoa powder
  • 1 tsp baking powder
  • 2 tsp baking soda
  • 1 tsp salt
  • 1⅓ cup Demerara sugar
  • 2 eggs (room temperature)
  • ¾ cup vegetable oil
  • 1 cup buttermilk (Add 1 tbsp white vinegar and add milk to form 1 cup)
  • 1 cup hot coffee (1 tsp instant coffee granules dissolved in hot water)
  • 1 tsp vanilla extract
Chocolate whipped cream
  • 85g couverture chocolate (dark or milk, your preference)
  • 1 cup whipping cream
Chocolate ganache
  • 120g dark chocolate couverture (I used a mix of milk and dark couverture)
  • 1 cup whipping cream
To assemble
  • Simple sugar syrup (optional)
  • 3-4 large bananas, sliced
Instructions
Chocolate Cake
  1. Preheat oven to 170°C.
  2. Grease and line three 8 inch cake pans (you can use one large one and split the cake up as well)
  3. In a large bowl, sift together the dry ingredients.
  4. In another large bowl, combine the wet ingredients.
  5. Add the wet ingredients to the dry ingredients and using a whisk and starting from the centre, slow combine till you get a smooth batter.
  6. Divide among the cake pans and bake for 20-25 minutes or until a tester inserted in the middle comes out clean.
  7. Turn the cakes out of the pans and cool on racks completely.
  8. Wrap cakes in cling wrap and chill for 30 minutes or more to allow for easier frosting.
Chocolate whipped cream
  1. Melt chocolate in the microwave or in a double boiler. Allow it to cool for 15 minutes or so.
  2. Meanwhile, whisk whipping cream in the bowl of a standing mixer till it forms stiff peaks. (I chill the bowl and the whisk before use)
  3. Add ⅓ of the whipped cream to the melted chocolate to lighten it.
  4. Then pour the chocolate mixture into the remaining whipped cream and fold gently to combine.
Chocolate ganache
  1. In a small pot, heat whipping cream till bubbles form at the side. Do not allow it to boil.
  2. Pour hot whipping cream over chocolate and whisk till chocolate melts.
  3. Allow it to cool slightly and thicken before use.
To assemble
  1. Spray the first layer of cake with sugar syrup (optional)
  2. Spread whipped cream on the cake and top with sliced bananas
  3. Top with more whipped cream and place the second layer of cake above it.
  4. Add whipped cream, bananas and more whipped cream.
  5. Top with the third layer of cake.
  6. Ice the top and sides of the cake with more whipped cream.
  7. Place in the fridge to chill till firm.
  8. While the cake is chilling in the fridge, you can prepare your ganache.
  9. Place chilled cake on a rack.
  10. Pour ganache over the cake and allow it to flow down the sides.
  11. Chill cake till ganache sets.
  12. Slice, serve and enjoy.